,
based on child development research. How do we rate?
age 10+
Dance to the beat of the 80s with teenagers and seniors.
Not present
Parents need to know
Parents should know that this movie is mostly PG – there is only a little kissing and no drinking, swearing or drug use. But there is significant — and benign — teenage rebellion. Janey moves to a new school, meets a wild girl, and starts skipping class and sneaking out of her house to meet a boy. She doesn’t do anything dangerous, but she learns to disobey her parents. There are also indescribable shots of girls sitting around bedrooms in their underwear.
To stay up to date with more movies like this, you can sign up for the weekly Family Movie Night emails.
Sex, romance and nudity
a little
Natalie is shown lounging around her room in her underwear. Janey is hanging out in her bedroom in her underwear and tank top. There is an innocent but sexy dance. He pulled the girl closer to let her grab her chest. Janey and Jeff kiss.
Drink, drugs and smoking
very little
Wine is served at the party, but it is not drunk by teenagers and no one gets drunk.
Language
very few
“Butthead” is as strong as it gets.
Violence & Scariness
very few
The teenagers break through the glass window and comically throw the character into the cake.
Positive messages
very few
The film focuses on rebellious teenagers — a lot of what they get up to is on the mild side (skipping class, sneaking out of the house to meet boys and party), but their behavior doesn’t send a strong positive message to young viewers.
Positive role models
very few
Teenagers do things like lie to their parents and break the rules – they often have what they think are good reasons for their behavior, but that doesn’t make them ideal role models. One character sells term papers to other students and always wants to make money.
Videos and photos
age 12+
Based on 11 parent reviews
September 28, 2018
age 13+
A fun film with familiar themes of sexual assault from the 80s
I saw this movie as a kid and loved it. However, it wasn’t until I became an adult that I noticed that many of these 80s movies mentioned sexual assault. If a ‘harmless’ or ‘geeky’ guy did it, it’s funny. “Tune in Tokyo” is one example. I would have a consent debate before watching this movie.
August 11, 2022
age 13+
Fun but problematic (like most 80s RomComs)
This movie is full of nostalgia and is an overall fun show. I don’t know ONE teenager who just hangs out in their underwear as shown in this movie — so it seems unnecessary. I think the most disturbing part is Drew’s sexual assault on a woman with “play in Tokyo”. I don’t think the reviewers recognize how inappropriate this is – they just call it a “scam” when it comes to sexual assault. All in all, it’s fine – but parents should be prepared to talk to their kids about what makes it inappropriate.
What is the story?
In GIRLS JUST WANT TO HAVE FUN, Janey (Sarah Jessica Parker) goes to school in Chicago, where her favorite dance show is held, Dance TV. When the station announces that it is holding a competition to select two new dancers for the show, her best friend, Lynn (Helen Hunt), encourages Janey to try out. She has to lie to her drill sergeant dad and sneak out of the house, but when she makes it to the finals, will her dream come true? Will evil rich girl Natalie (Holly Gagnier) fix the competition to take the final spot? Will Jeff (Lee Montgomery) fall in love with her?
Is it good?
Sit back and giggle: This movie is just a good, cheeky time. Get a lot of help Hairspray (minus the political awareness and divine Ricki Lake) and sprinkle it with a candy-coated version My so-called life and what you have is a completely tubular 80’s teenage dance movie Girls just want to have fun. With bad fashion (neon fingerless gloves, anyone?), bad hair, and even worse dancing, this movie features some of today’s most popular actors doing some of the cutest things you’ve ever seen. Check out the pre-Sex and the City Parker as a Catholic school brat who dreams of dancing on Dance TV (hosted by Richard Blade, who some ’80s music fans may remember as an LA radio DJ). Watch her do back flips and practice dance lifts a la Dirty dancing. Watch as Academy Award-winning actress Hunt nails it in some of the most absurd – but actually worn-out – ’80s ensembles and big, flowing hair. That’s it Totally Awesome without irony. And if you like the 80s, then is totally awesome.
Forget the plot, though. Just concentrate on Solid Gold quality dance tracks and outrageous fashion. Forget, if you can, that Helen Hunt is too mature – she looks like she’d pull off the role of Lynn (where’s AJ Langer when you need her?) and just look for a cameo by teenage Shannen Doherty and the New Wave girls in Cindy Lauper’s video for “Girls Just Want to Have Fun”.
Talk to your kids about…
Families can discuss appropriate ways to blow off steam – what are the things kids often want to do that parents won’t let them do? Are they dangerous?
Do you think Jane’s father’s rules are too strict? How do you deal with rules you don’t like?
What are the role models of the characters in the film? Can a teen movie have strong positive role models and still be entertaining?
Did we miss something about diversity?
Research shows a connection between children’s healthy self-esteem and positive portrayals in the media. That’s why we’ve added a new “Different Representations” section to our reviews, which will be published continuously. You can help us help children
Some candle containers look as beautiful as the wax that fills them smells. And when that wax has almost expired, the whole candle should not be thrown away.
Instead, candle jars can be reused around the house after being emptied and cleaned. But even small amounts of candle wax can be difficult to remove. So we’ve rounded up some great methods for getting candle wax out of a jar – here’s what you need to know.
Warning
Never pour melted or softened candle wax down the drain. It can harden in your pipes and cause serious plumbing problems. Instead, pour the wax into a disposable container, let it cool, then throw the whole thing away
Boil some water
Getty Images / Jena Ardell
Here’s how to use boiling water to get rid of those last wads of stuck-on candle wax. Use this method only on candles with thick glass walls.
Boil a small pot or kettle of water.
If there is more than an inch or so of wax left in the candle, use chopsticks or skewers to poke holes in the candle.
Pour boiling water into the candle. Let it sit until the wax softens and loosens.
Pour the waxy water into a disposable cup or bowl. Throw it in the trash when the liquid cools.
Want more cleaning and organizing tips? Sign up for our free daily newsletter for the latest hacks, expert tips and more!
Use the oven
Need to remove the wax from more than one candle? Try using the oven. However, like the boiling water method, this wax removal technique should only be used on candles with thicker glass jars.
Preheat the oven to 180 degrees and line a tray with several sheets of baking paper.
Place the candles upside down on the baking sheet, then place the pan in the oven for 15 to 20 minutes.
Remove the candle pan from the oven. Wipe the inside of the candles with paper towels – be sure to hold the candles with oven mitts or tongs.
Throw away soiled paper towels and parchment paper.
Try the freezer
Grace Cary / Getty Images
The freezer is another easy kitchen shortcut to get rid of stubborn candle wax. Here’s what to do.
You may be able to get surprisingly far removing small amounts of wax with just a knife or butter spoon. Here’s what you need to know.
Use an old (but clean) spoon or butter knife to scrape off small pieces of wax.
Throw away small pieces of wax.
After removing as much wax as possible, clean the candle with dish soap and warm water.
If the jar still looks dirty, use a cleaner like rubbing alcohol or Goo-Gone to remove any residue.
Make a water bath
Water baths can be used to melt more than just chocolate – they can also be used on candle wax.
Bring a pot of water to the boil and take a large heatproof bowl.
Place the candle upright in a heatproof container.
Slowly pour the boiling water into the candle container until it is an inch or more above the candle wax line.
Let the candle and boiling water sit for a few minutes.
When the wax on the edge of the candle softens and pulls away from the wall of the jar, remove the jar from the container. Discard the remaining wax and throw it in the trash.
FAQ
The easiest way to remove candle wax from a jar is to use the freezer, as it requires a little effort on your part. All you have to do is break up any large chunks of wax with a butter knife, put the candle in the freezer overnight, and then in the morning use the same knife to remove the clumped wax from the jar.
Boiling water is best for dissolving large amounts of stubborn candle wax. It can be poured directly into the jar and soften the rest of the wax. Rubbing alcohol can also be used to remove wax residue – simply wet a paper towel with it, then rub it all over the inside of the jar.
,
based on child development research. How do we rate?
age 10+
The outdated classic has colonial racial views.
Not present
Not present
Not present
Parents need to know
Parents need to know that some children may be disturbed by the violence, and others may be disturbed by the scene in which Elizabeth Curtis admits that she did not love her husband, and that she seeks him out of guilt, not loyalty.
To stay up to date with more movies like this, you can sign up for the weekly Family Movie Night emails.
Violence & Scariness
some
Some, including fights to the death with various weapons.
Drink, drugs and smoking
a little
Bad guy drinks brandy.
Positive messages
none
The film is full of colonial attitudes and racism. Although these aspects of the film were standard for the period, the film has not aged well because of them and today it looks dated.
Videos and photos
age 9+
Based on 1 parent review
What is the story?
IN KING SOLOMON’S MINE, Elizabeth Curtis (Deborah Kerr) hires Africa’s best “white hunter” (Stewart Granger as dashing Allan Quartermain) to help her find her husband, who is lost in search of King Solomon’s legendary diamond mines. At first he refuses, saying that women have no place on safari. When she offers twenty times his usual fee, he accepts, but remains skeptical of her motives and her ability to survive the journey. In traditional “road movie” fashion, they develop respect and affection through their adventures.
Is it good?
Our review:
children say: Not rated yet
This is the best of many versions of H. Rider Haggard’s classic adventure novel. The story (and performances) are a bit creaky, but it’s an old-fashioned Technicolor spectacular, with breathtaking, Oscar-winning cinematography. Filmed on location in Kenya, then Tanganyika and the Belgian Congo, bits and pieces from this film were used in several other films, including the otherwise poor 1977 remake. Scenery and animal shots are stunningly clear and vivid, especially the unforgettable shot of a newly unwound baby alligator and the scene of the Watusi dance.
Talk to your kids about…
Did we miss something about diversity?
Research shows a link between children’s healthy self-esteem and positive portrayals in the media. That’s why we’ve added a new “Different Representations” section to our reviews that will be published on an ongoing basis. You can help us help children
Nothing is more soothing than soft neutral shades, selected worktops and clean tables in a kitchen or living room inspired by minimalism. But having a truly minimalist home is about much more than design choices—it’s also about keeping each room clutter-free.
Whether you’ve recently remodeled in this style or need little ways to stay on top of your cleaning, these are the items the designer (and self-confessed minimalist) cleans daily to keep her home a consistently soothing space.
Meet the expert
Nina Lichtenstein is a New York-based home designer specializing in minimalist spaces inspired by nature.
Old and empty toiletries
Spruce / Jacob Fox
According to home designer and minimalist Nina Lichtenstein, having a clutter-free home can do wonders for keeping your mind clear. This is especially true in spaces like the bathroom, which can turn into a spa-like retreat for relaxation when well maintained.
“A tidy home is not just about aesthetics – it’s about creating a space where you can breathe, think and feel relaxed,” she says. “Whether it’s an empty shampoo bottle or skin care container, dispose of toiletries as soon as they’re used to keep your space functional and visually appealing.”
Keeping the sides of the tub and shower shelves as small as possible will also make cleaning the bathroom easier and help you avoid the dreaded moment mid-shower when you realize that the product you need is really gone.
Want more cleaning and organizing tips? Sign up for our free daily newsletter for the latest hacks, expert tips and more!
Accounts and labels
Between grocery shopping and morning coffee, Lichtenstein warns that the bill pile can add up quickly.
And while it’s important to save them during return periods or to record expenses, she says addressing and cleaning up each piece of paper will help keep your desk empty and your countertop clean — and make it much easier to find the one you need if you do eventually you need to send something back.
“When you commit to preserving an item, receipts and labels no longer serve a purpose,” says Lichtenstein. “Shoving these into drawers or bags creates clutter that’s all too easy to ignore until it becomes overwhelming.”
Online Shopping Packaging
Oscar Wong / Getty Images
Whether it’s Amazon finds, capsule clothing or household goods, online ordering is an integral part of everyday life – even for minimalists. But even if your picks are especially thoughtful, Lichtenstein says the packaging they arrive in can be a major cause of the mess.
“Cardboard boxes, packing peanuts and bubble wrap add up quickly,” she says. “Break them down and recycle or dispose of them as soon as your orders arrive to free up space.”
To keep flattened boxes and packaging out of sight until recycling day, try keeping a lidded container in the coat closet near the front door or a multi-section trash can and recycling bin in your kitchen.
Junk mail
Digging through a huge pile of envelopes and advertisements to find those few important bills can be a nightmare, which is why Lichtenstein recommends sorting and throwing out unnecessary pieces of mail as soon as your daily delivery arrives.
“Paper clutter is one of the biggest culprits of chaos,” says Lichtenstein. “Tossing out junk mail and expired coupons daily keeps the counters clean and prevents piles of unnecessary paper from piling up.”
If you’re an avid reader of newspapers or magazines, she also advises recycling each weekly and monthly issue as soon as you’re done browsing.
Broken or damaged items
Spruce / Rachel Vanni
While we may have every intention of fixing a broken appliance, piece of kitchen wear, or item of clothing with a hole in it, Lichtenstein believes that if we don’t make the repair right away, it’s unlikely to be done in the future.
“That cracked mug or broken phone charger you’ve been meaning to fix? If it’s been sitting there for a while, it’s time to part ways,” she says. “These items just add guilt and visual clutter.”
Stale food and empty containers
Another area of the home Lichtenstein always tells her clients to focus on keeping clean is the kitchen. Cooking can be a lot of fun when the ingredients are easy to find, but it can turn sour quickly if you come across something expired or unusable hiding in your fridge or pantry.
“Nothing detracts from the atmosphere of your kitchen faster than forgotten leftovers or wilted produce,” she says. “A quick daily scan of the fridge will keep the kitchen fresh and avoid unpleasant smells and surprises later.”
To simplify things even more, keep the week of meals ahead of you in mind as you cook and compost or throw away any perishable ingredients you won’t need for future meals as soon as you’re done with them.
Using the best cleaning products will keep your newly renovated home in tip-top shape – but a collection of nearly empty spray bottles, too many products, brushes and old rags could have the opposite effect.
There’s also one item Lichtenstein says you should stay on top of replacing.
“Sponges can harbor bacteria and lose their cleaning power over time,” she says. “Regular replacement (and quick disposal of the old) ensures a cleaner home and healthier kitchen.”
Small Miscellaneous Items
The final category of cleaning that Lichtenstein recommends staying on top of because minimalist is broad—but it’s also one of the most important and can affect every room in your home.
“Small things like paper clips, loose buttons and bent pins seem insignificant, but they can quickly overwhelm small spaces like drawers,” she says. “If you have no use for them, throw them away.”
These one-of-a-kind little items can extend beyond your junk drawer, so keep an eye on your closet, bathroom, and jewelry stash for any stray socks, loose earring pads, and random lids with no product to go with them.
From the time your child starts grasping things with his fingers until he is 4 or 5 years old, you need to be careful about choking hazards.
Children under the age of 4 are most likely to choke on something. This is partly because they tend to explore their world by putting things in their mouths.
Advertisement | page continues below
This is also because they are still learning how to chew and swallow food. Babies at 6 or 7 months can bite off a piece of food with their new front teeth, but they won’t be able to chew properly until all their molars have come in and they’ve had a lot of practice with them – usually by the time they’re 4.
Key Takeaways
Children under 4 are more likely to choke than older children.
The biggest choking hazard for babies and toddlers is food that is hard, chewy, sticky, and round or circular in shape, as well as small objects like magnets and batteries.
It is important to carefully monitor young children while they are eating and limit their access to objects that pose a choking hazard.
The biggest choking hazards for babies and toddlers
Babies and toddlers can choke on a surprising number of things, but you can’t eliminate every potential choking hazard or be on the lookout for them every minute of the day.
That’s why it’s important to baby-proof your home, as well as supervise your little one when he’s cruising around the house.
It helps to know what the biggest choking hazards are for this age group and to focus on limiting access to your child or closely supervising them when something unsafe might happen. These are the biggest choking hazards for children under 4:
Hard foods that a child cannot chew or squish with the gums, including raw vegetables and hard candies
Unsliced round foods, such as grapes, cherries and grape tomatoes
Foods cut into circular or “coin” shapes, such as hot dogs and carrots cut horizontally
Foods that are sticky, such as peanut butter, candy, or gum and marshmallows
Stringy foods, such as cheese sticks
Dry, powdered foods and substances, including baby powder
Button batteries and other small items such as coins, magnets and safety pins
Even innocuous household items you might not think about can pose a choking hazard. “My oldest took the rubber end off the door stop and put it in his mouth. I had to dig it out,” he says BabyCenter Community member cdh29821. “He scared me so much!”
Advertisement | page continues below
11 tips to prevent choking
Pay attention. Supervise young children whenever they eat. (Kids usually can’t make noises to warn you that they’re choking.) This means you don’t let your child eat in the car while you’re driving or in the stroller while you’re pushing him. And make sure others don’t give your child something to choke on.
Be prepared for worst case scenarios
Learn how to deal with an emergency directly from an emergency physician in our CPR and Choking Course
Stay seated while eating and drinking. Do not allow children to eat while lying down, walking, playing or running.
Encourage slow eating. One way to do this is to make sure your child has a drink to hand during meals (like water or milk). Encourage sips between bites to make sure your child is chewing and swallowing, not stuffing his mouth with food that could cause choking.
Keep baby food soft. Puree or mash food so that it is soft enough for your baby to chew or chew, and be sure to cook vegetables such as carrots, broccoli and green beans until soft before cutting them into small pieces.
Cut the finger food into small pieces. When your child is ready for finger foods, the American Academy of Pediatrics (AAP) recommends that you cut the food into pieces no larger than 1/2 inch. (See more guidelines for safe finger foods.)
Advertisement | page continues below
At first, it can be difficult to tell if your baby is choking or just convulsing, and this can cause a lot of anxiety.
– Dr. Liz Donner, Pediatric Hospital
Spread a thin layer of nut butter. Drips from peanut butter and other nut butters are a choking hazard. Spread nut butter thinly on bread or crackers. Or dilute it with water or applesauce.
Choose your snacks wisely. Do not give children popcorn, gum, nuts, seeds, hard or sticky candies, or marshmallows until they are at least 4 years old. (The seeds may be too small to choke on, but they can get stuck in a child’s airway and cause an infection.)
Do not use tooth gels. Do not use teething remedies. It can numb the throat and interfere with the child’s ability to swallow.
Avoid small objects. Do not allow small children to play with buttons, coins, safety pins, magnets, batteries, balloons, small rocks, or anything with parts smaller than 1 1/4 inches around or 2 1/4 inches long. You can use a roll of toilet paper or purchase a “small object suffocation tester” to help you assess the safety of an object. If the object fits completely into the cylinder, there is a risk of suffocation.
Move mobile. Make sure your child can’t reach a hanging cell phone.
Advertisement | page continues below
Keep baby powder away. Do not allow children to play with baby powder containers. The powder can shake off and clog your child’s throat.
What to do if your child is choking
First, determine whether your child is choking or simply convulsing. Constipation is normal for babies, especially when they first learn how to eat solid food, and is not dangerous.
“At first, it can be hard to tell if your baby is choking or just colic, and that can cause a lot of anxiety for parents,” says Liz Donner, MD, a pediatric hospitalist and member of BabyCenter’s medical advisory board. “Gaping is a normal human reflex designed to clear the throat to prevent choking. Learning to eat involves a lot of gagging, which can manifest as vomiting, near-vomiting, coughing, watery eyes, and tongue thrusting. However, choking occurs when a child no longer can breathe, cough, cry or speak. That’s when you know it’s time to intervene.”
Here’s how to tell the difference:
A gagging child will gag, cough, and possibly throw up as their body tries to dislodge the object from their mouth. It is usually okay to let go of a child who is convulsing; interfering by patting them on the back or reaching into their mouths can actually make things worse.
A choking child is often silent. They won’t be able to talk, cry or cough because their airways are blocked. They can also turn blue if they don’t get oxygen. A child who is choking needs emergency help.
Advertisement | page continues below
If your child is choking, call 911 or have someone else call. For instructions on how to clear a child’s airway, see our infant first aid guide for choking and CPR, as well as our guide for toddlers and older children.
,
based on child development research. How do we rate?
age 10+
The confusing fantasy has overdone, lame special effects.
Not present
Not present
Parents need to know
Parents need to know this The Last Leprechaun is a 1998 film about a leper and two children who try to thwart the evil plans of a greedy butler and a terrifying woman possessed by a banshee. The female Banshee is the biggest concern — especially for younger viewers — as she’s pretty terrifying, and combined with the screaming and howling cheesy audio effects, you’ve got a nightmare in the making for sensitive viewers. Additionally, the butler likes to eat bugs he comes across while in the stables, for no apparent reason. There’s also a healthy dose of comic gaffes – characters falling out of windows, falling into a pig trough and throwing food in each other’s faces.
To stay up to date with more movies like this, you can sign up for the weekly Family Movie Night emails.
Violence & Scariness
some
Butler’s hand slammed shut and the door was pushed open by two children. The woman possessed by the banshee carries pitchforks and drives them in and around the hay where the two children are hiding from her in the barn. A woman who has been possessed by the spirit of a banshee often speaks in what could be considered a terrifying voice as her eyes turn green and make various threats to those around her. One character threatens another character to gouge out his eyes and put them in his balls.
Drink, drugs and smoking
very few
The characters drink wine and brandy at dinner, but they don’t act drunk.
Language
very few
“Damned foolish children.”
Positive messages
very few
Friendship is always better than greed.
Positive role models
very few
As a fantasy story, the characters generally don’t deviate from the archetypes they’ve been given.
age 14+
Based on 1 parent review
October 19, 2019
age 14+
Pretty trivial plot and very silly acting.
I would not recommend this for a child of any age.
What is the story?
In the basement of an Irish mansion, butler Simpson (David Warner) casts a spell and brings a banshee back to life in hopes that the banshee will help him find gold and make him rich. Instead, the banshee demands possession of a human body, and as the banshee demands it, the lady of the house, Laura (Veronica Hamel), descends the basement stairs. Simpson throws a banshee at Laura and learns too late that the banshee will not serve him, but the other way around. Meanwhile, two children from America — Ethel and Tommy — are sent to live with their future stepmother Laura while they await the arrival of their real estate developer father (Jack Scalia). When they realize that something is wrong and evil with Laura and Simpson, they start seeing a leper named Finn. It’s up to the kids to protect both Finn and their father from the clutches of Laura and the Simpsons, and they must prove to their father that Laura is, in fact, a banshee.
Is it good?
THE LAST LEPRECHAUN is marred by cheesy audio special effects and superb acting, especially in the case of Veronica Hamel. She screams, moans and howls her way through her role as a greedy woman possessed by a banshee. Much of the film, in fact, seems overdone. Why does the butler eat cockroaches while in the barn? Why is there so much plot? Why does food fight? Everything seems to be done just to provide shock value to keep the audience engaged through a subpar story.
Speaking of which: while the story should be easy to follow, it often isn’t. The butler brings the banshee back to life in the form of his boss, and she wants to sell the land to energy interests while brainwashing her future husband while trying to scare her future husband’s children, while the gob is gallivanting his eye and has gold hidden somewhere, and the kids have to convince their father to his fiancee is actually a banshee. Something like that. It’s a lot to take in, with no real payoff, and everything about the acting and special effects makes it difficult – if not impossible – to care one way or another how it will all, predictably enough, end.
Talk to your kids about…
Families can discuss leprechaun movies. How is this similar and different from other films involving leprechauns?
How did the film present Irish culture and folklore? Was this an accurate representation? Did you learn anything about Irish culture?
Did you find the story confusing? How could the story have been told in a clearer way?
Did we miss something about diversity?
Research shows a link between children’s healthy self-esteem and positive portrayals in the media. That’s why we’ve added a new “Different Representations” section to our reviews that will be published on an ongoing basis. You can help us help children
When it comes to home organization, there are certain trends that fade over time. Here, three professional organizers take a look at six home organization trends they think are a thing of the past and share why these approaches aren’t super popular anymore.
Moral of the story? Functionality is key, everything else is secondary!
Overcomplicated systems
You have to be realistic about the organizational tools you put in your home. It won’t be easy to stay organized over time if you use overly complicated systems, explains Jessica Litman, founder of The Organized Mama.
“Instead, stick to simple one-to-two-step organization,” she says.
For example, this means not placing bins that you will need to access frequently in hard-to-reach areas such as the attic. After all, you may be delaying the cleaning task further if you have to use a ladder to reach your boxes.
Want more cleaning and organizing tips? Sign up for our free daily newsletter for the latest hacks, expert tips and more!
Rainbow Colored Systems
eleonora galli / Getty Images
Remember when people grouped books and other household items by color? Maybe you even did it in your space for a while. However, it is a trend that is no longer in vogue, Litman explains. Of course, it’s certainly still a look you can embrace if you want, but if that means sacrificing functionality, it’s time to move on. Why not sort the books alphabetically by author or arrange them by subject instead?
Appropriate storage bins
Daniel Cortez / Getty Images
In the world of home organization, it’s not uncommon to see pictures of closets and garages lined with dozens of matching clear containers. However, there’s no need to settle for a paired look if it’s more convenient or affordable to go the other way when it comes to your storage containers.
“While matching storage bins are still a great way to create a cohesive and polished look, I’ve found that focusing solely on aesthetics can sometimes overshadow functionality,” says Eryn Donaldson, founder of The Model Home.
The organizer recommends that its clients prioritize securing storage bins that are durable, versatile and efficient within a given space – whether they coordinate with each other comes second. In addition, it is important to find units that will be durable and affordable.
“I always encourage my clients to first choose storage solutions that fit their space and lifestyle,” she says.
Minimalism without clutter
Don’t be so hard on yourself when it comes to clutter. After all, not everything has to work out.
“Minimalism isn’t going anywhere, but the idea of completely clutter-free, ultra-sparse spaces is starting to take off,” says Donaldson.
These days, she works with many clients who crave a lived-in look in their homes and don’t want their space to look super sparse.
“My approach is about intentional organization—curating spaces that are orderly, functional, and meaningful to the people who live there,” she says.
Walk-in closets
This type of setup is no longer functional for today’s homes, explains Tracy Wu, manager of Avenue Studio.
“People are now looking for more functionality and more beautiful design,” she says.
Wu adds that going the custom route is the most popular, with people looking for door panels and organized storage inside.
If you live in a rental property, consider how you can make the most of your existing reach-in closet by adding your own temporary solutions, such as rolling carts, removable shelves, and the like. Small upgrades like these can do wonders in making a small closet much more functional for everyday use.
Enclosed Pantries
onurdongel / Getty Images
No pantry? No problem, at least these days, Wu explains.
“People are willing to free up space to add more space for a bar or beverage center,” she comments, noting that the days of insisting on a small food and dry goods warehouse are behind us.
,
based on child development research. How do we rate?
age 10+
Positive messages, some spicy texts in the recorded event.
Parents need to know
Parents need to know that the lyrics are performed in the halftime show streamed live on Netflix and are available online as Beyoncé Bowl contain some edgy material and serve as a promotion for Beyonce Cowboy Carter album and other products. There are sexy clothes and dancing, and the songs mention smoking, drinking, kissing, cheating, turning people on and shooting. Cowboy Carter songs from the album and this mixed performance bring back the black roots of country style and some Texas tradition. Most of the performers are black, including the HBCU marching band. Teamwork is shown. “Curse” is said.
To stay up to date with more movies like this, you can sign up for the weekly Family Movie Night emails.
The lyrics describe someone who was shot and killed (and then brought back to life).
Sex, romance and nudity
very few
Sexy dance and costumes, mentioned in the lyrics of kissing, excitement and cheating.
Various representations
a lot
The Cowboy Cardsongs from the album and this mixed performance bring back the black roots of country style and some Texas traditions. Most, but not all, of the performers and guest acts here are Black, dressed in cowboy gear and white. Band members from Texas Southern University, a historically black university (HBCU), perform.
Positive messages
some
Recognizing black roots in country music and cowboy/rodeo culture.
Positive role models
some
The performers offer a highly professional and upbeat exhibition, demonstrating a high level of teamwork.
There are no parent reviews yet. Be the first to review this title.
What is the story?
BEYONCE BOWL is a 13-minute NFL halftime show featuring Beyonce with hundreds of supporting acts in her hometown of Houston in December 2024.
Is it good?
Our review:
Parents say : Not rated yet
children say: Not rated yet
If you missed the live halftime show, now is your chance to watch this extraordinary performance event on streaming. In just 13 minutes, Beyoncé Bowl it is filled with the aroma of Americana from its landmark Cowboy Carter album, beautiful vocals and – to be expected – fantastic choreography and fashion. The event featured hundreds of performers showcasing a variety of backgrounds and styles. This is well worth a quarter of an hour of your time.
Talk to your kids about…
Families can discuss the idea of streaming a 13-minute halftime show live online, as Netflix has done with Beyoncé Bowl. Would you watch other editions of this event? Why or why not?
Describe the teamwork you think goes into planning, dressing, choreographing and performing a show like this. Where could you go for more information?
What other performers, performances and references did you recognize in this show?
What do the statements say about the roots of country music and cowboy/rodeo culture Cowboy Carter and this halftime show make? Where can you find more information about it?
Did we miss something about diversity?
Research shows a link between children’s healthy self-esteem and positive portrayals in the media. That’s why we’ve added a new “Different Representations” section to our reviews that will be published on an ongoing basis. You can help us help children
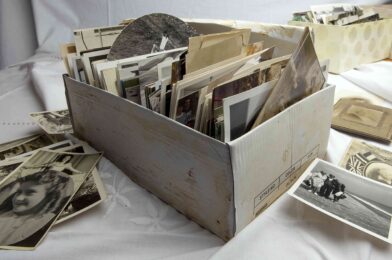
Although today most of our photos are stored on our phones, there are unique physical images of family members and ancestors that will likely never be digitized. Since there has been such a huge advance in photo printing over the last decade, it can lead to some confusion about how best to store physical copies for longevity.
To help demystify the process, we reached out to a few professional organizers for their photo preservation tips.
Meet the expert
Liora Seltzeris a certified KonMari Method professional organizer and founder of the organization blog It’s What U Keep.
Diane N. Quintanais a professional organizer and founder of DNQ Solutions.
Laura Asher is a DIY and lifestyle influencer and founder of the natural home blog Our Oily House.
Set a specific time and pace
Westend61 / Getty Images
Sorting through years of printed photos can be a daunting task, but it’s a necessary step in preserving those that matter most. The best thing you can do is set aside enough time, ideally over a few days.
“It’s not a project that can be done in one sitting,” says professional organizer Liora Seltzer. “So pace yourself and make sure you get some rest after sorting.”
Want more cleaning and organizing tips? Sign up for our free daily newsletter for the latest hacks, expert tips and more!
Set a goal or intention for your photos
Whether you’re trying to downsize and make more space or want to create a new photo album, Seltzer suggests setting a goal for your photos before you start. This will help you best determine what can be saved and what can be thrown away.
Remove all duplicates
Nico De Pasquale Photography / Getty Images
Once you’ve decided when and how to sort through your photos, professional organizer Diane N. Quintana says the next step is to look for duplicates or near-duplicates.
“Keep one and throw the rest away,” she says.
The same goes for anything that is blurry or too dark to see. Don’t throw away something you might regret, but if it doesn’t make sense to keep it (and that includes a duplicate), it can go.
Protect from damage
DIY influencer Laura Ascher says the three biggest threats to printed photos are sunlight, temperature and humidity. To avoid damage from these elements, she adds silica gel packets to her photo storage boxes and avoids storing photos in the basement, garage or attic.
“While that might be convenient, those locations are notorious for fluctuating temperatures and high humidity, which can lead to discoloration, distorted photos, and fading,” says Ascher.
For the same reasons, Seltzer says he prefers waterproof buckets. But if you must store your photos in a less than desirable location, avoid placing bins or boxes directly on the floor.
“There are many stories of people losing all their photos because they were in cardboard boxes that didn’t survive a flood or burst pipe,” says Seltzer.
Use acid-free photo boxes and albums
ISO3000 / Getty Images
If you don’t need something as big as a waterproof bucket for your photos, or want extra protection, Quintana says acid-free boxes are essential.
“These boxes are specially made to keep photos safe,” she says.
Ascher agrees and says that, in addition to acid-free boxes, he also prefers acid-free albums.
“I find that simple acid-free albums, when labeled well, work well and are often economical,” she says.
These boxes and albums are usually stackable, making them easy to store in closets or cabinets, as well as inside waterproof bins.
Mark everything correctly
However you decide to store and save your photos, it’s crucial to tag everything. Be sure to label the outside of your bins or storage boxes, along with the back of the photos.
“Use a pencil to mark the back of the photo with all the information about the image,” says Quintana. “Who is shown in the picture, where it was taken and the date.”
Keep the digital copy
Gary Yeowell / The Spruce
Now is a great time to scan your photos and turn them into digital copies so they can actually be preserved. This helps keep your photos safe and gives you the ability to create a beautiful photo book in the future.
Repeat this practice every year
To avoid another pile of printed photos, Ascher suggests repeating this process every year. You can even apply it to your digitally stored photos.
“As well as being the perfect excuse to revisit old memories, it’s a great opportunity to weed out duplicates, add tags and ensure your system is still working for you,” she says.
As your process evolves, you can also add a high-quality scanner, external hard drive and cloud storage to preserve your memories in multiple formats.


:max_bytes(150000):strip_icc():format(jpeg)/GettyImages-1830701211-1c67bb74d62e457e9e7ef11983478189.jpg)


:max_bytes(150000):strip_icc():format(jpeg)/230224-2124-Gary-0066-1-e3bac7a991d94e578e5e1937b313f016.jpg)


:max_bytes(150000):strip_icc():format(jpeg)/GettyImages-1975587061-84ed379939df4795b8ec361f1dd04beb.jpg)


:max_bytes(150000):strip_icc():format(jpeg)/GettyImages-497382293-1a9fdf60802846458642e0b6ef9e3184.jpg)